Showing posts with label Tops. Show all posts
Friday, 19 August 2016
A Little Obsessed with Capes
So, the reason I made the previous cape was because I actually had wanted to make this one. But unfortunately I've never worked with a crochet diagram before and since it was written in Japanese, I had no idea how to start. Anyways, I had asked r/knitting for help, and somebody eventually actually responded! So, after finishing up that last cape, I decided to not have their help wasted and make another cape. I must say, it is adorable! I didn't do really well with the chord and pom-poms but the cape itself was something I'm pretty proud of. I think this might be the last thing for the baby, unless anything else compelling comes up!
Wednesday, 3 August 2016
Heroes wear capes :)
Moooore baby things! I found such a cute poncho pattern that I really wanted to try out! I don't think I've ever crocheted something like this before because the pattern gave me a little more trouble than any other crocheted pattern has (I think because I had to search up some term like sk sp, and ch-3 sp), but I got the hang of it quickly. It's made for 3-6 months old, so that's why it looks a little big on my creepy baby.
If she wears this in the winter though, I think she'd look like a snow princess :D
I thought it was a unique gift too because how often do people give baby ponchos as gifts?!I want to crochet more ponchos :D
Monday, 1 August 2016
Minnie Mouse
I am in a baby accessories making frenzy! Really hoping that it all fits my friend's baby though or that she'd like it! I thought I'd continue with the photogenic type of baby clothes. So .. I decided to make this Minnie Mouse set. (Also, I'm addicted to crocheting right now! ... I guess because I used to think I really sucked at it, and now I realize that I'm doing a pretty good job!)
Anyways, here's the Minnie Mouse shoes!


Next, I had to make the dress! Underneath is a diaper cover that I had to crochet first.
With the dress, it looks a bit like a mushroom that you'd see from Super Mario heh.
![]() |
| Back of the dress/diaper cover |
![]() |
| In case anybody is wondering how it looks like opened. Looks like ovaries. |
![]() |
| Front side with the diaper cover open. |
![]() |
| How it looks like on a baby. |
![]() |
| The Minnie Mouse hat! Needed to sorta fluff it out to make it look good. |
![]() |
| With it all together it looks really good! |
| |
| .. And on a 'baby'! |
I think it looks adorable! But I'm always worried that it won't look good or won't fit on an actual baby. Maybe that's why I'm making so much things because I'm hoping one of them will work out haha.
Monday, 26 October 2015
Wowow! You'll like what I made!!
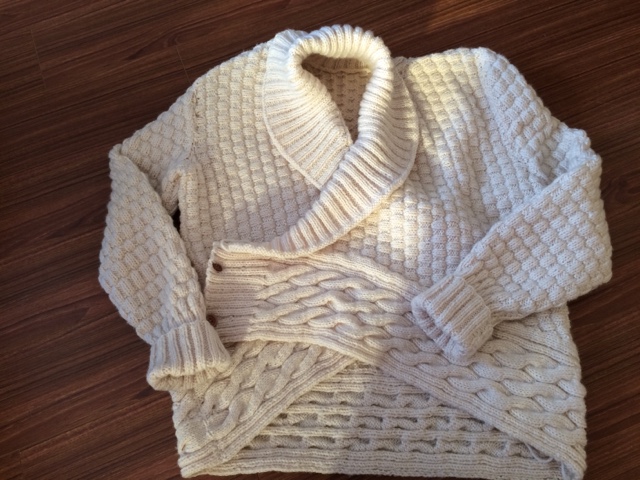
I know I always say this, but I'm so super proud of myself! After two months, I completed my second cardigan! It was my first time knitting sideways instead of bottom-up on any top. For some reason, it felt longer that way.
The sleeves were knit normal bottom-up though. Near the end, I was pretty sick of knitting that same elongated checkered pattern.
Anyway, I don't have a lot to say about this. Maybe my brain is tired from all the knitting. Well, it reminded me, as well as reaffirmed the fact that I hate picking up stitches!!
I always feel like I do it so unevenly. But anyway I'm just going to throw a bunch of pictures your way!
Monday, 30 March 2015
More Baby Things!
I'm so paranoid that the owl earflap hat wouldn't even fit a newborn because it is just so small, so I decided to knit something a little bigger this time that would hopefully fit even a one year old. As a result, I feel like I made the cutest project ever: the Apple Blossom Cardigan.
The bow, I actually made from another pattern because I felt like it would be much cuter than a simple tied together bow string that the original pattern suggests. The only part I had to figure out was how I can make it so that one could clip on and clip off the little bow. Well, thank goodness I bought all those buttons, because I thought of a good solution that will utilize it! I single crocheted a long chord, and double crocheted one end for a button hole, and attached the bow with a button on the back on the other end, so that it will fit together like this:
Pretty creative right? While knitting the bow, I actually wasn't sure if I was doing it right, since before you tie the whole thing together, it looks like this:
Anyway, one of my favourite things from the cardigan pattern is that I learned to make a picot edging!! I actually had no clue what the pattern meant when it said to 'sew down the picot edges' and I had to Google it. Suddenly, all the yarn overs and k2tog made sense! The end result is so pretty and it looks much neater than a cast on/ off edge. So basically, the YO and k2tog will get you this:
After that, you literally just fold it in half, and sew it down (but having to remember to be careful to not sew into any of the stitches in the front so you won't see the seam in the front).
And so, you should end up with this:
Besides my first picot edging, it was also my first top-down cardigan. It was pretty cool to see it come together in this way, and much easier to gauge whether or not it was long enough.
Anyway, I love it! I almost want to keep it for my own future children and give my coworker something else, ha! But I won't ... hopefully, they'll love it as much as I do! I can't wait until I have kids of my own, I will knit them into the most fashionable baby ever!
![]() |
| The cardigan, the bow, and close-ups of the edge and lace pattern! |
| Cardigan without the bow |
The bow, I actually made from another pattern because I felt like it would be much cuter than a simple tied together bow string that the original pattern suggests. The only part I had to figure out was how I can make it so that one could clip on and clip off the little bow. Well, thank goodness I bought all those buttons, because I thought of a good solution that will utilize it! I single crocheted a long chord, and double crocheted one end for a button hole, and attached the bow with a button on the back on the other end, so that it will fit together like this:
![]() |
| (Left) Bow on (Right) bow off |
Anyway, one of my favourite things from the cardigan pattern is that I learned to make a picot edging!! I actually had no clue what the pattern meant when it said to 'sew down the picot edges' and I had to Google it. Suddenly, all the yarn overs and k2tog made sense! The end result is so pretty and it looks much neater than a cast on/ off edge. So basically, the YO and k2tog will get you this:
After that, you literally just fold it in half, and sew it down (but having to remember to be careful to not sew into any of the stitches in the front so you won't see the seam in the front).
And so, you should end up with this:
Besides my first picot edging, it was also my first top-down cardigan. It was pretty cool to see it come together in this way, and much easier to gauge whether or not it was long enough.
Anyway, I love it! I almost want to keep it for my own future children and give my coworker something else, ha! But I won't ... hopefully, they'll love it as much as I do! I can't wait until I have kids of my own, I will knit them into the most fashionable baby ever!
Monday, 23 March 2015
The Moose is on the Loose
So, just under one month of straight knitting - knitting when home from work, before work, before bed, weekends .. basically until my fingers have all but given up on life, will get you this:
Man, it was fun to make. But by the time I got to the last sleeve, I was ready to call it quits. The first reaction I got from the first few people I showed it to went along the lines of "Wow, that's nice.. but can you make it a little longer?" Well, no I can't! I've casted off already! And, this was a 90's style pattern so I'm pretty sure (not that sure ..) that this was the style back then.
Like the problem with my slippers, when it came down to finding buttons, I just had to settle for ones that looked similar enough. Who knew there was fifty shades of brown that existed?
I made this cardigan out of that giant worsted weight red heart package my aunt bought me, if anyone recalls. I thought I'd have used up at least three of the four balls. But, nope. I didn't even use up one. There is a lot of yardage in one of those balls.
![]() |
| All the material needed to make this thing! |
I feel like I still need to work on my colorwork. I'm actually not sure if I'm doing it right! In the picture below, you can see how some of the black is peeking out where it should be all white.
Regardless, I love the way it turned out.What drew me to this pattern is sort of cheesy. Something romantic about two moose coming out to eat on a chilly winter evening.
[Edit: I forgot to credit the pattern designer! Here it is!]
Monday, 12 January 2015
My Frankenstein Sweater
I call it Frankenstein because my sweater was made up of many different patterns all flung together. It all began when I was searching the internet, and somebody linked this, saying that they had to have it, and was willing to make it themselves if anybody had the pattern. Well, when I saw the cabled skull design, I thought it was the coolest thing ever too, but there was no way I was going to shell out $1,000+ for it (there was no sale for it yet at the time, but even so I wasn't going to pay that amount of money). So, with a little more digging, I found this amazing person that posted the skull pattern. Awesome, I thought, this is what I'm going to make next. And with that, I bought this:
Those lucky balls of yarns is going to give birth to my cabled skull sweater! So, as I was about to get to work, I realized something. Oh shit, the person only provided the skull pattern, and nothing else. And also .. I never made a sweater before. So, what to do. Okay, no problem, I'll just go online, and use another sweater's pattern as the base and guideline of how to make a sweater. And so, I found this sweater pattern, chosen because its' design is similar to the back of the original Alexander Mcqueen sweater so I can just use it for the pattern at the back of my sweater.
As I was about to start knitting, I realized another dilemma. The guideline sweater pattern is made with dk weight yarn, and I bought worsted weight. At this point, I could feel the dust flying off my brain as the wheels in my head began to turn. Alright, I'll just find a random worsted weight sweater pattern online and see how much stitches they used to cast on. I also needed to make up a pattern for those cabled rings that run alongside the skull which you can see in the original. So after a bunch of copy and pasting, modifying and adjusting, I finally started knitting. You can see how I organized everything and had my own crudely made paint chart next to the neat skull chart provided by the website I found.
As I sewed everything up, I began to have mixed feelings. Negative feelings because I knew I would soon have to weave in ends which I hate. Positive feelings because, wow I was about to reach what in my head felt like a knitting milestone!! After sewing everything up, I almost forgot to knit my collar which you can see me doing here:
When I was done, I was super excited! The only living thing around however was my dog (it was nighttime approximately 2am). She didn't wake up when I shook her to try to wake her up though. I was a bit disappointed I couldn't share my excitement with anybody until the next day (which I wore to work to get some compliments, haha)! It wasn't too bad though. My dog gave me a laugh because it looks like she's trying to do the Michael Jackson Thriller dance in her sleep.
Tl;dr:
Those lucky balls of yarns is going to give birth to my cabled skull sweater! So, as I was about to get to work, I realized something. Oh shit, the person only provided the skull pattern, and nothing else. And also .. I never made a sweater before. So, what to do. Okay, no problem, I'll just go online, and use another sweater's pattern as the base and guideline of how to make a sweater. And so, I found this sweater pattern, chosen because its' design is similar to the back of the original Alexander Mcqueen sweater so I can just use it for the pattern at the back of my sweater.
As I was about to start knitting, I realized another dilemma. The guideline sweater pattern is made with dk weight yarn, and I bought worsted weight. At this point, I could feel the dust flying off my brain as the wheels in my head began to turn. Alright, I'll just find a random worsted weight sweater pattern online and see how much stitches they used to cast on. I also needed to make up a pattern for those cabled rings that run alongside the skull which you can see in the original. So after a bunch of copy and pasting, modifying and adjusting, I finally started knitting. You can see how I organized everything and had my own crudely made paint chart next to the neat skull chart provided by the website I found.
After lots and lots of cable work, I was finished with the front! I moved onto knitting the sleeves. It took me a long time to find sleeves that I thought would fit best with my Frankenstein and I wanted everything to be perfect. Using this, I began my sleeves. For some reason, I'm really fond of the seed stitch, so I chose to use that instead of the stockinette stitch that the sleeve pattern suggested.
After casting off the sleeves, I began the back. I had to modify the pattern slightly though, because since the pattern was written for dk weight, it originally told me to CO 146 stitches. However, my sweater only casted on 108 so out of the 4 charts one would be following in theirs, I only followed 2 charts in mine. I went in not quite sure how the end product would look like, but I think it all worked out for the best:
Having the back finished means I was done all my pieces! Wow, that only took about one and a half months.. Anyway, Frankenstein pieces, assemble!As I sewed everything up, I began to have mixed feelings. Negative feelings because I knew I would soon have to weave in ends which I hate. Positive feelings because, wow I was about to reach what in my head felt like a knitting milestone!! After sewing everything up, I almost forgot to knit my collar which you can see me doing here:
When I was done, I was super excited! The only living thing around however was my dog (it was nighttime approximately 2am). She didn't wake up when I shook her to try to wake her up though. I was a bit disappointed I couldn't share my excitement with anybody until the next day (which I wore to work to get some compliments, haha)! It wasn't too bad though. My dog gave me a laugh because it looks like she's trying to do the Michael Jackson Thriller dance in her sleep.
Tl;dr:
Friday, 19 September 2014
Green and Blue
I feel so relieved! I was able to finish this project before I headed off to vacation! (Heading to Malibu!) It's called the dijon top, and I wanted to make it as soon as I first laid eyes on the pattern! It's adorable! However, it is a little short, but I think it looks cute with short shorts. A little flirty, and with a strong summer feel!
So, why is it green and blue? Well, the answer is simple ... I could tell there wasn't going to be enough blue only after knitting the back. Good thing I still had some green fingering yarn! I don't think it looks too odd with dual colors since the bottom is still the same ivory.
Here's a closer up of the feather and fan stitch that the tank is composed of!
It's so pretty even though it was easier to make than it looks. Its basically a bunch of K2Tog with YO. Anyway, I'm so glad its done, I'm going to probably bring it with me on vacation!
Monday, 9 June 2014
Another 'First'
I learned to crochet successfully! You could probably tell from my previous post that I was crocheting a pretty pink something, and that something is ......
..... a shrug!! I think it looks fantastic, and it looks really impressive for such a beginner project. Basically all you need to know is how to chain and single crochet and you end up with something pretty warm and cozy! I guess after I got the hang of crocheting, I must admit that it does work faster than knitting. It feels a little stiff though, but I'm not sure if that's from the yarn being crocheted or because the yarn quality itself felt kind of stiff (I used 100% acrylic Red Heart). Regardless, I love it, and definitely something that I wouldn't be embarrassed to wear outside haha.
If you want to make your own, here is the link! I think I will definitely be crocheting again! I want to become more familiar with its techniques and whatnot now that I have the very basics pat-down. I don't know if my knowledge of knitting helped, but I noticed my first crochet project had considerably less mistakes in it than my first knit project (straight single crochet vs. Straight knit stitch). Anyway, for my next project, I have no idea whether to knit something (because I sort of miss it) or to crochet a new something... hm.. but I think I'll give it one or two days before I dive into anything new!
Subscribe to:
Posts (Atom)


.jpg)
.jpg)

%2B-%2BCopy.jpg)